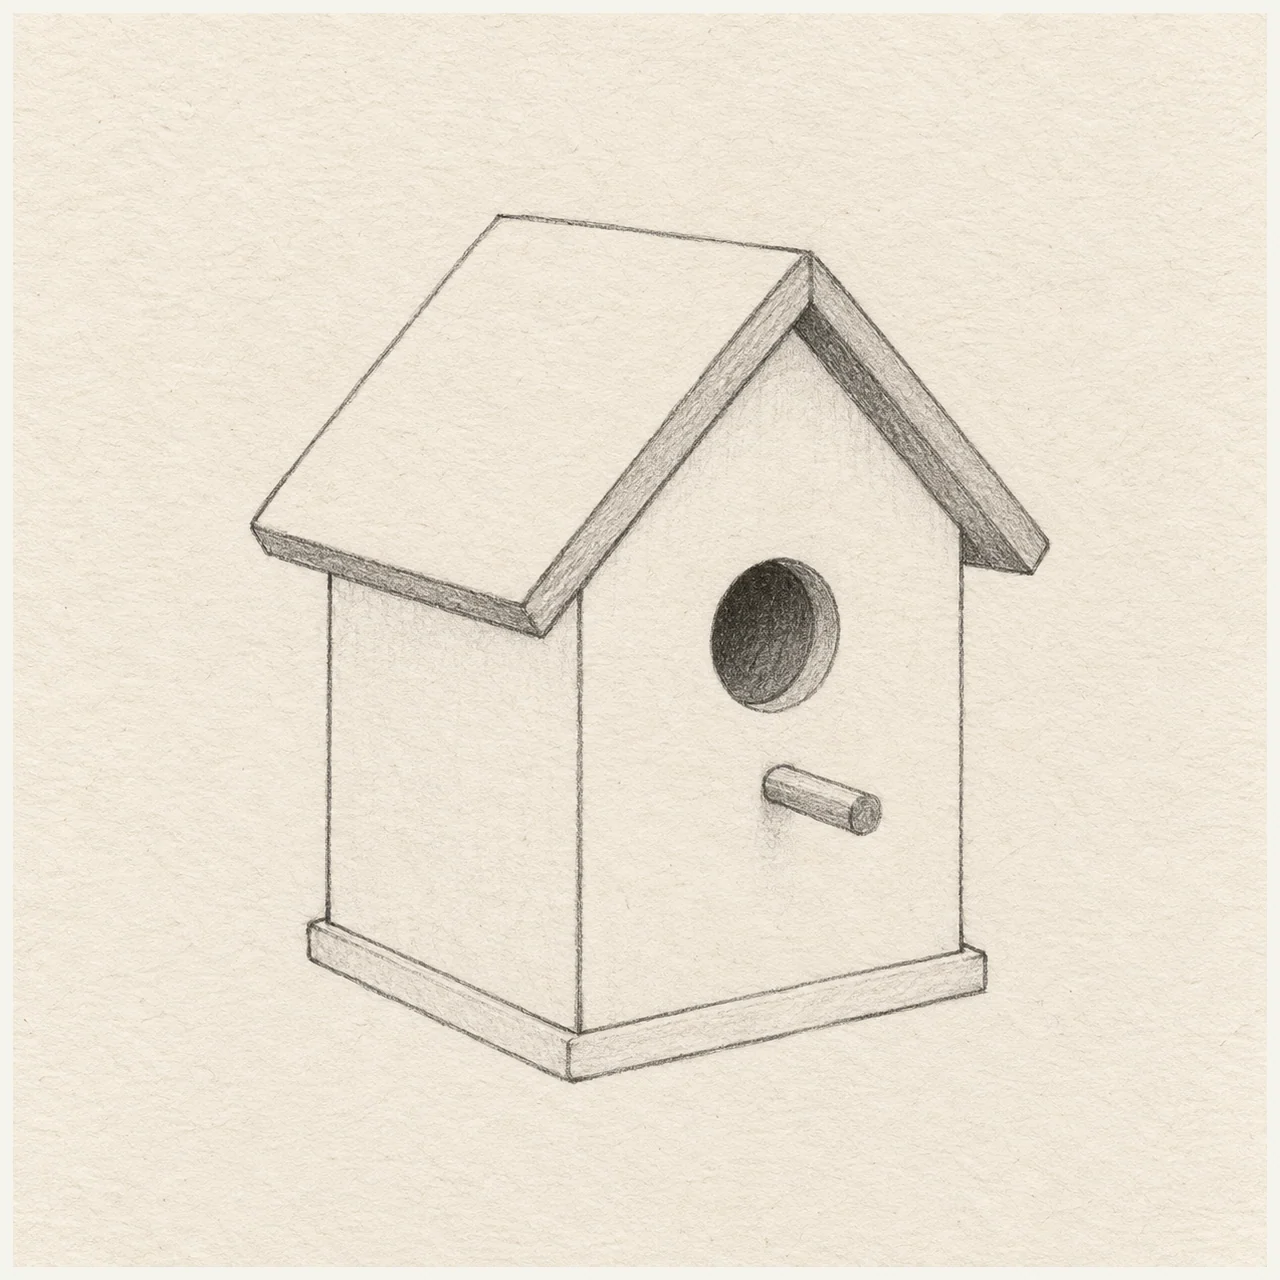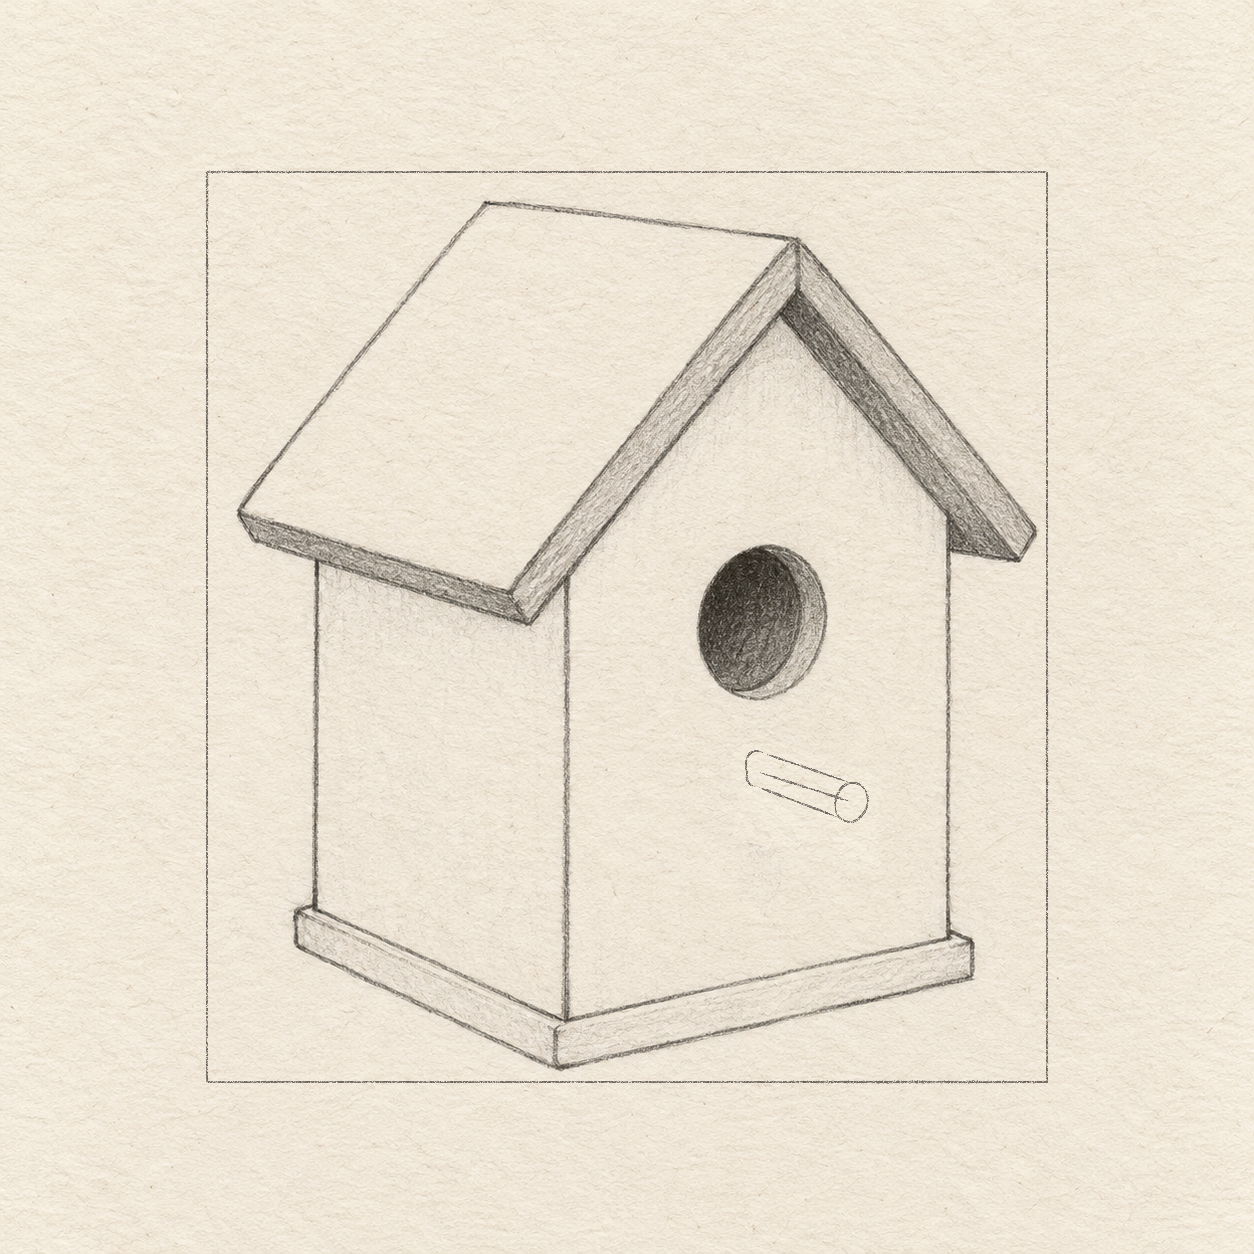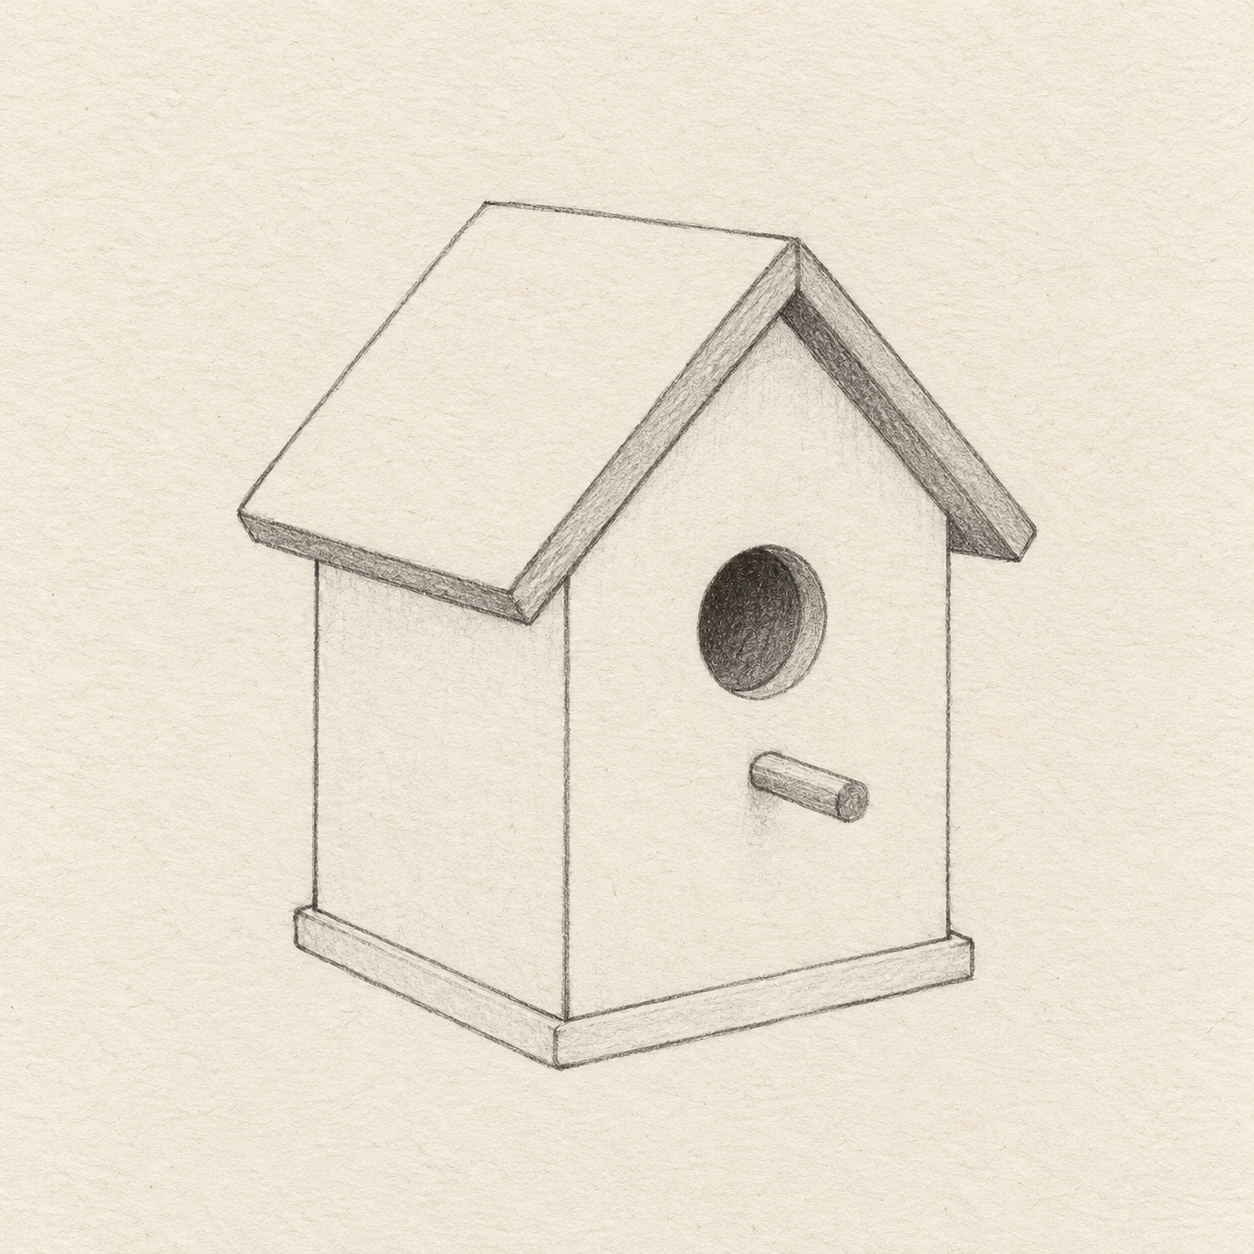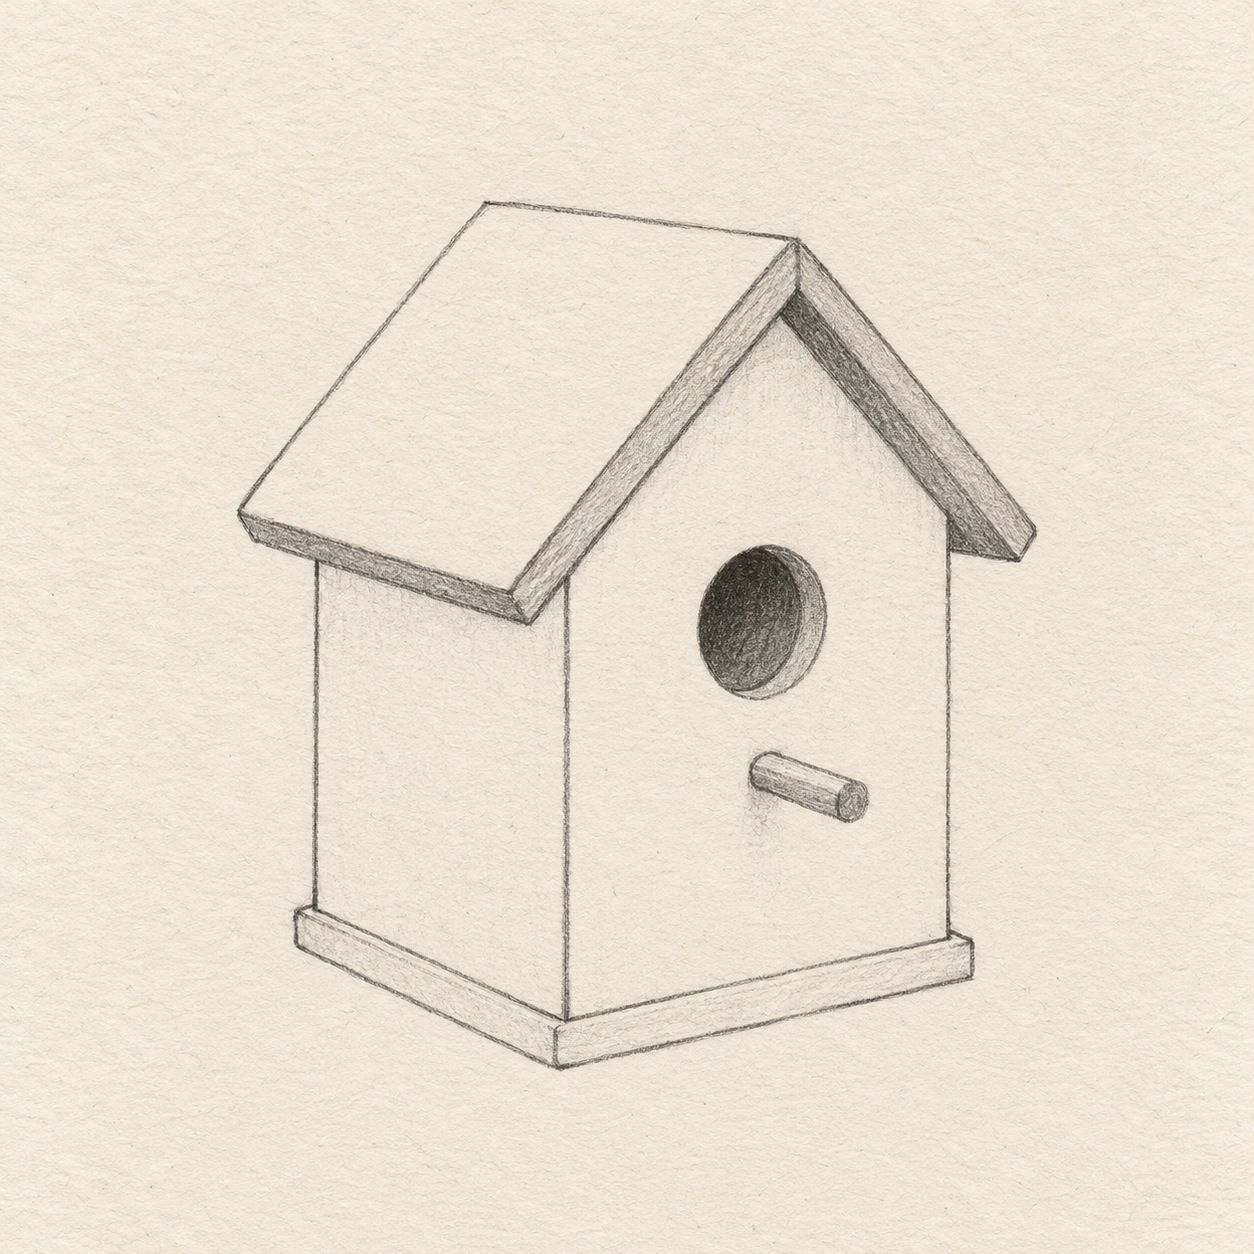
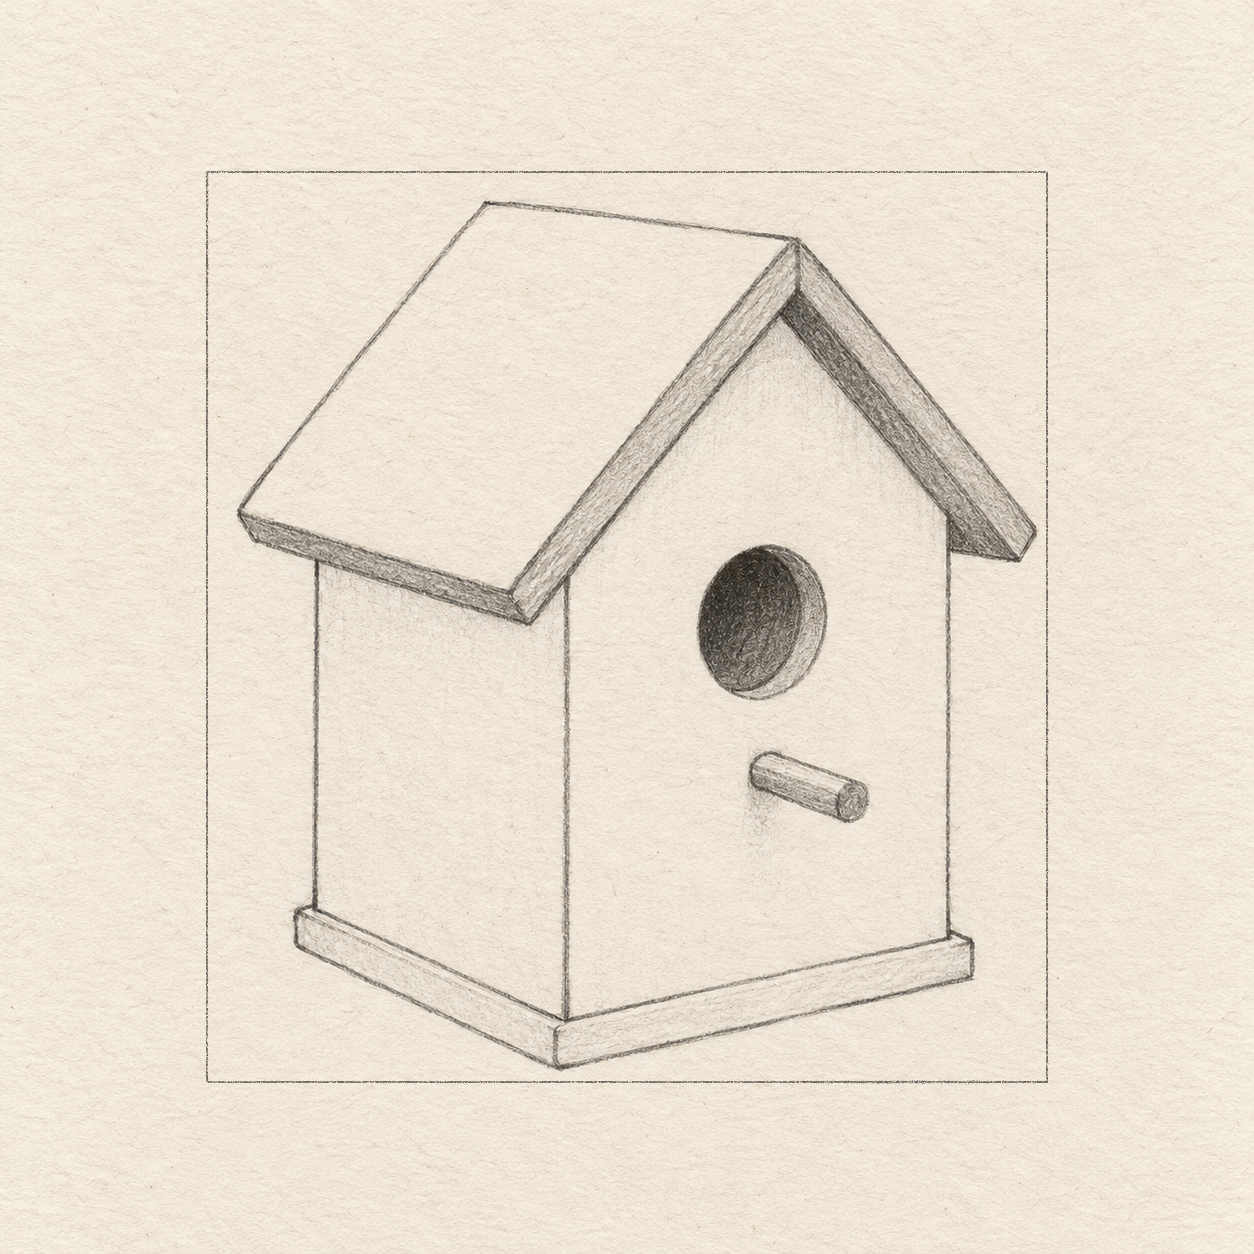
Graphite sketch of a plain birdhouse with a pitched roof, round opening, and short perch on textured off-white paper.
Drawing referenceAbout reference use

A birdhouse with a simple pitched roof

Build a plain birdhouse from a box and pitched roof. A round opening, short perch, and broad roof overhang add structure without detailed wood grain.

Everyday objectsEasyPencilReference practice: about 15 min
Save reference

Follow the drawing tutorial

Build this three-quarter-view birdhouse from measured roof corners and wall drops, then add a low base, tilted entry and short perch with restrained graphite.

Start the 7-step tutorial

A small thing to tryAim the roof and box edges toward the same direction so their perspective agrees.

Draw it, one step at a time

How to draw this pencil birdhouse

Build this three-quarter-view birdhouse from measured roof corners and wall drops, then add a low base, tilted entry and short perch with restrained graphite.

7 steps · 13 progress drawings Full tutorial: about 45 minutes, at your pace

What you’ll need

  • HB pencil
  • 2B pencil for the dark entry, if available
  • Ruler marked in centimetres and millimetres
  • Soft eraser
  • Sketchbook paper large enough for a 12 cm by 13 cm working box

Before you start

Picture-left and picture-right mean the sides of your page. Measure across and down from the working box’s top-left corner unless an existing mark is named. All measurements are approximate; gently erase and correct a misplaced light guide before strengthening it. Use a ruler for the light straight construction, and draw the selected pencil edges, ovals and hatching freehand. Keep the working box until the final task. Each named Drawing shows the result of its nearby actions; each Detail shows that same Drawing more closely. Put the 12 cm wide, 13 cm high working box where you want the birdhouse, leaving paper around it; centring is optional.

  1. Step 1 of 7 · Pencil

    Set the working size

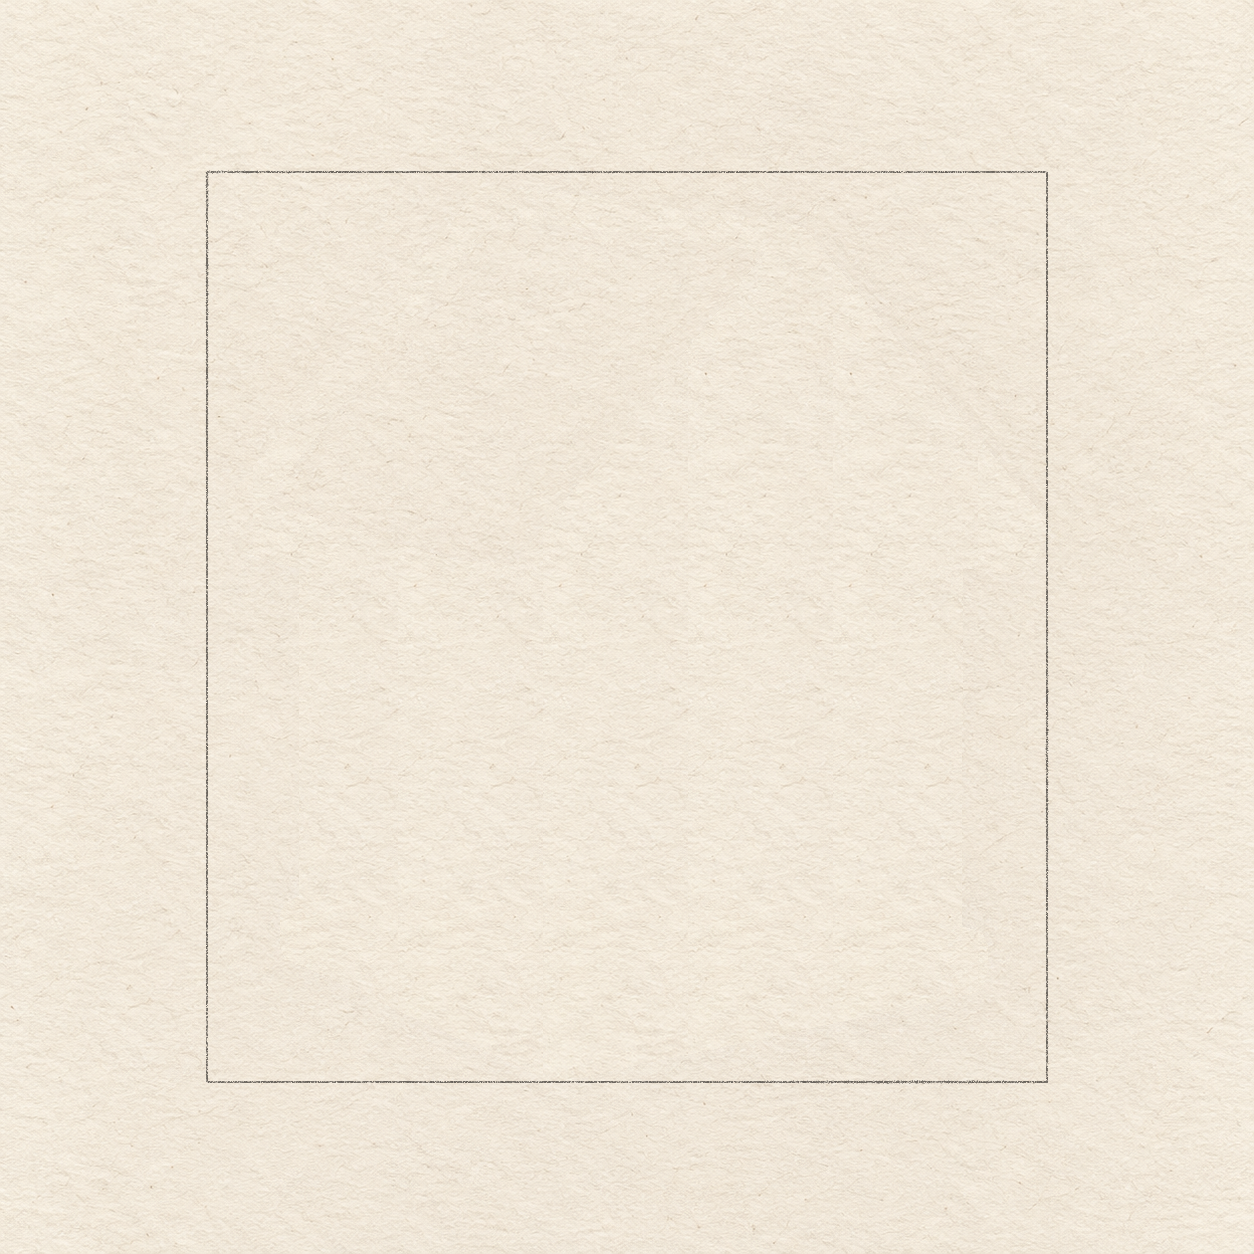
    One light 12 cm by 13 cm working rectangle on textured paper, with no birdhouse marks yet.
    Drawing 1A — Measured working boxView larger

    Instructions for Drawing 1A — Measured working box

    1. Choose where you want the 12 cm by 13 cm working box, leaving paper around it. With a ruler and light HB pencil, draw a 12 cm horizontal top edge. From each end, draw a 13 cm side straight down, then join their lower ends. This box contains the complete roof and base.
    Next step — Build the pitched roof
  2. Step 2 of 7 · Pencil

    Build the pitched roof

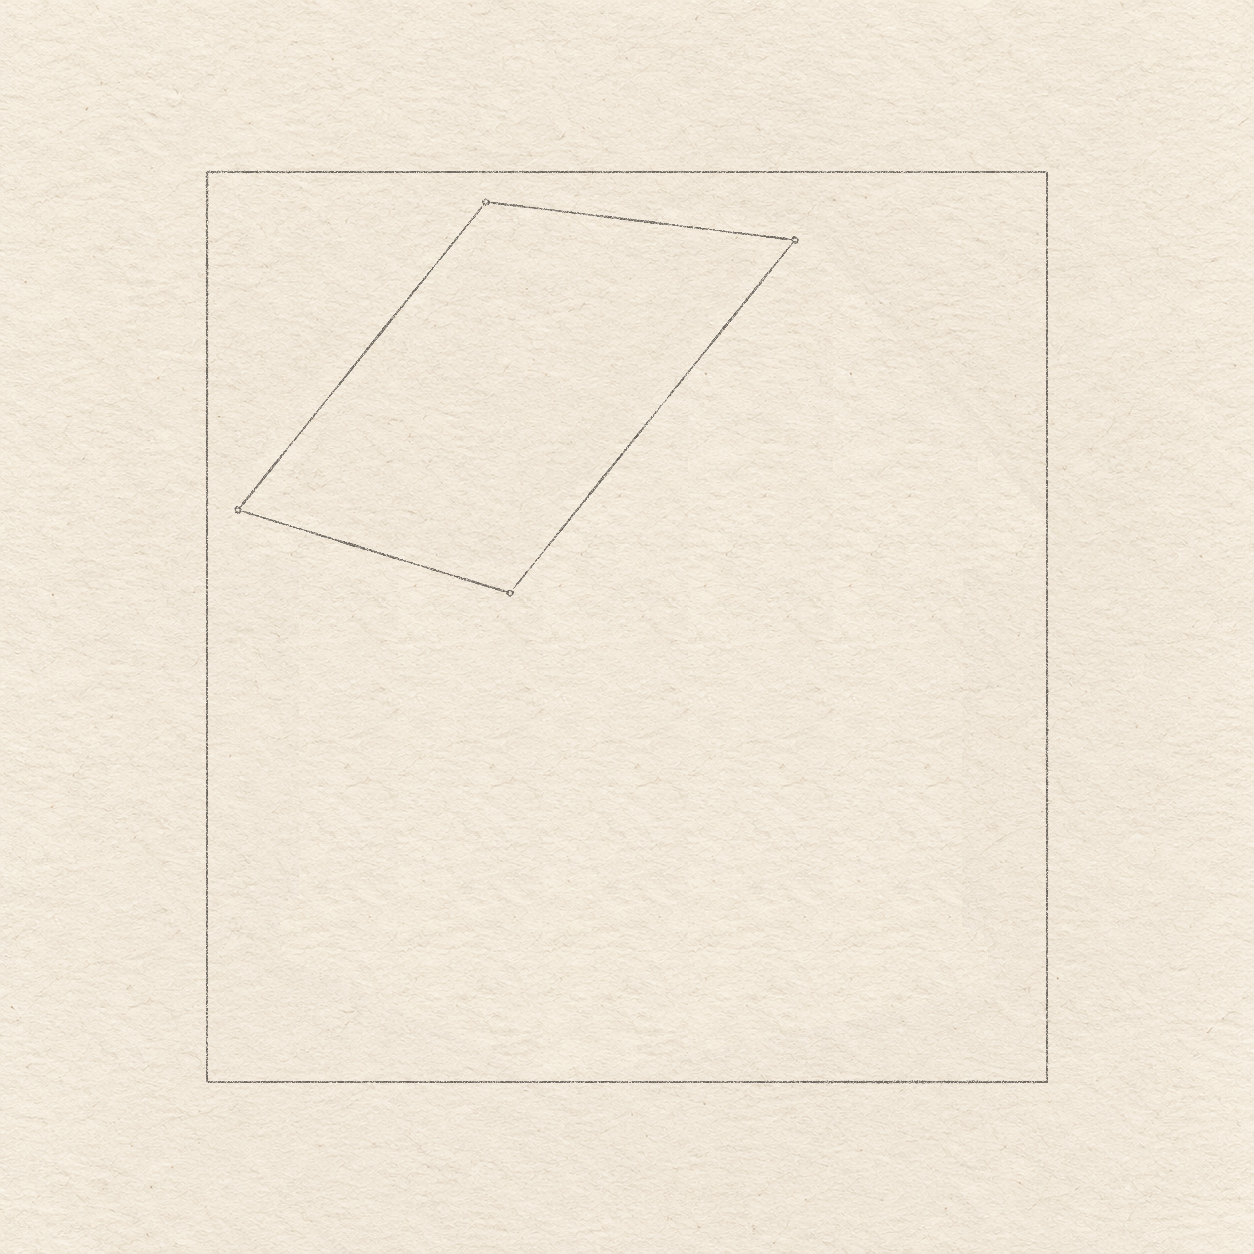
    Four small pencil dots and four joined sloping guides form the broad left roof plane inside the unchanged working box.
    Drawing 2A — Four corners of the broad roofView larger

    Instructions for Drawing 2A — Four corners of the broad roof
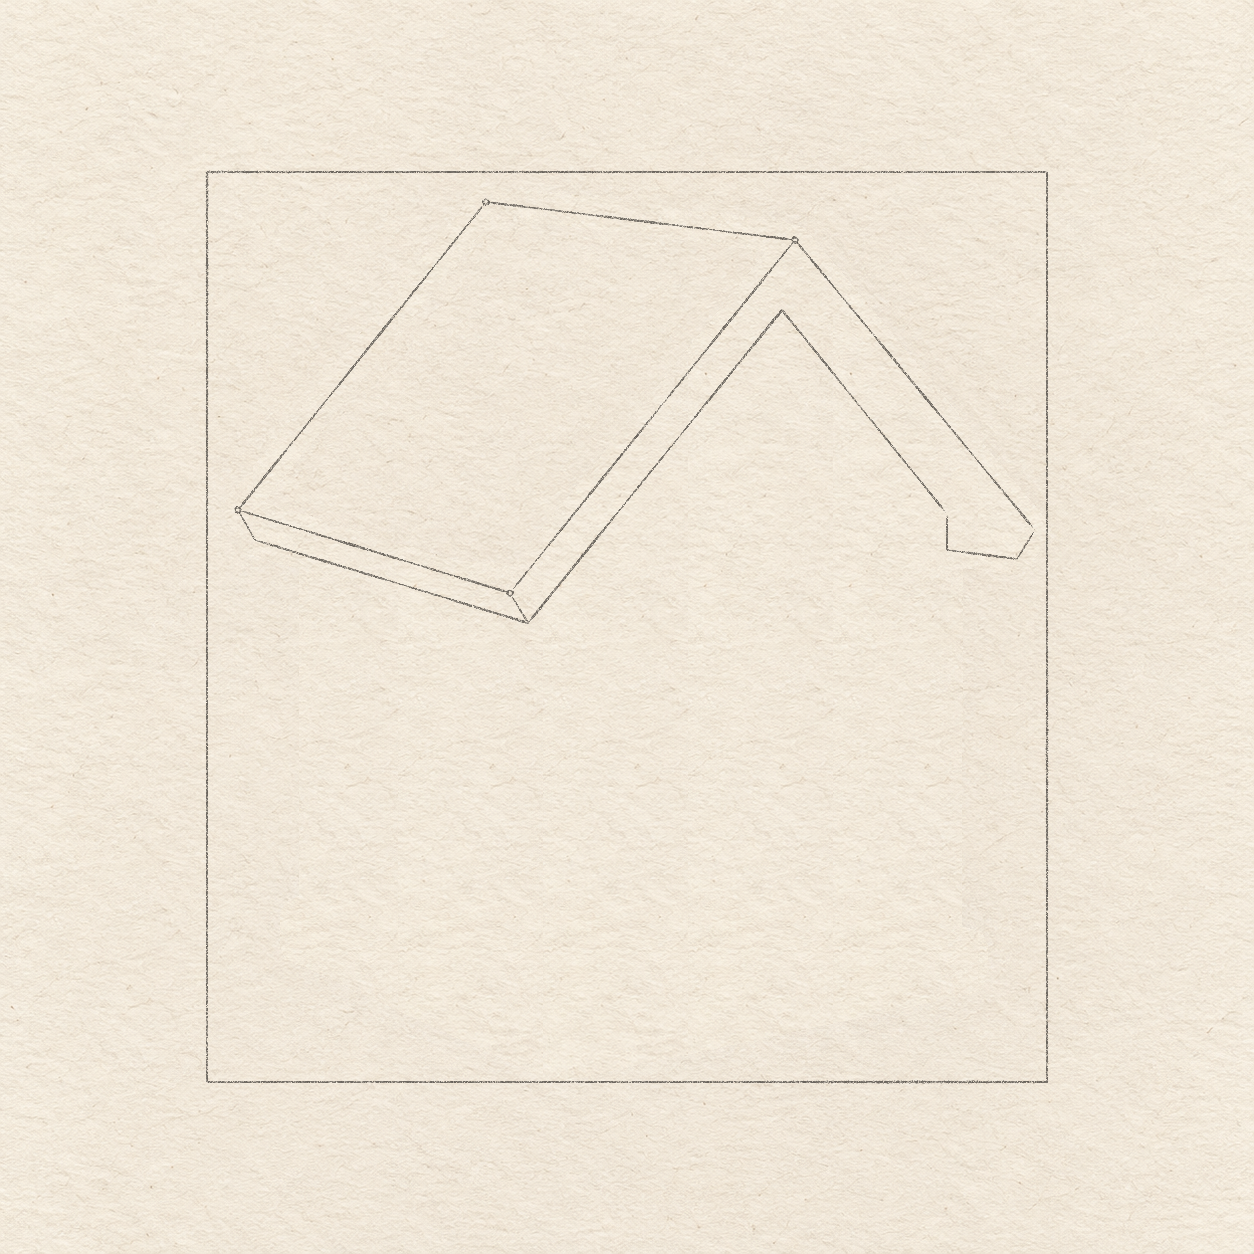
    1. Measure across and down from the box’s top-left corner. Mark the back ridge point 4 cm across and 4 mm down. Mark the front ridge point 8.4 cm across and 1 cm down. These two points set the short roof ridge.
    2. From the same box corner, mark the left eave 4 mm across and 4.8 cm down. Mark the near eave 4.3 cm across and 6 cm down. These are the two lower corners of the broad roof plane, not wall corners.
    3. Use the ruler lightly to join the back ridge to the front ridge, then the near eave, then the left eave, and back to the back ridge. Compare this four-sided guide with Drawing 2A; correct a misplaced corner now. Keep its interior empty.
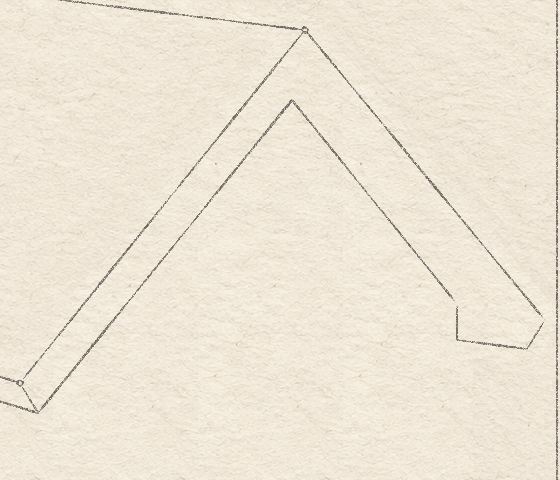
    The same broad roof guide now has its thin lower left edge and separately measured sloping front roof strip, with no graphite fill yet.
    Drawing 2B — Roof thickness and front slopesView larger
    The inner roof peak is below the ridge. At the right, a short upright step and lower sloping return close the roof strip before any shading.
    Detail 2B.1 — Roof strip and right-hand returnThe inner roof peak is below the ridge. At the right, a short upright step and lower sloping return close the roof strip before any shading.

    Instructions for Drawing 2B — Roof thickness and front slopes
    1. For the roof’s far-right corner, mark 11.8 cm across and 5.1 cm down from the box corner. Join the existing front ridge to this point with a light straight guide. This completes the other outer roof slope.
    2. Below the left eave and the near eave, mark a second point about 2.5 mm right and 4 mm down from each. Join these two new points, then join each back to its own eave. This narrow strip gives the left roof edge its thickness.
    3. Mark the inner peak 8.2 cm across and 2 cm down from the box corner. Mark the inner right corner 10.6 cm across and 4.9 cm down. Join the new lower near-eave point up to the inner peak, then down to the inner right corner. These inner slopes leave a front roof strip around them.
    4. From the inner right corner, draw 5 mm straight down. From that lower point, go about 1 cm right and 1 mm down, then join back to the outer far-right eave. Compare this small step with Drawing 2B before shading; keep the inside of every strip empty.
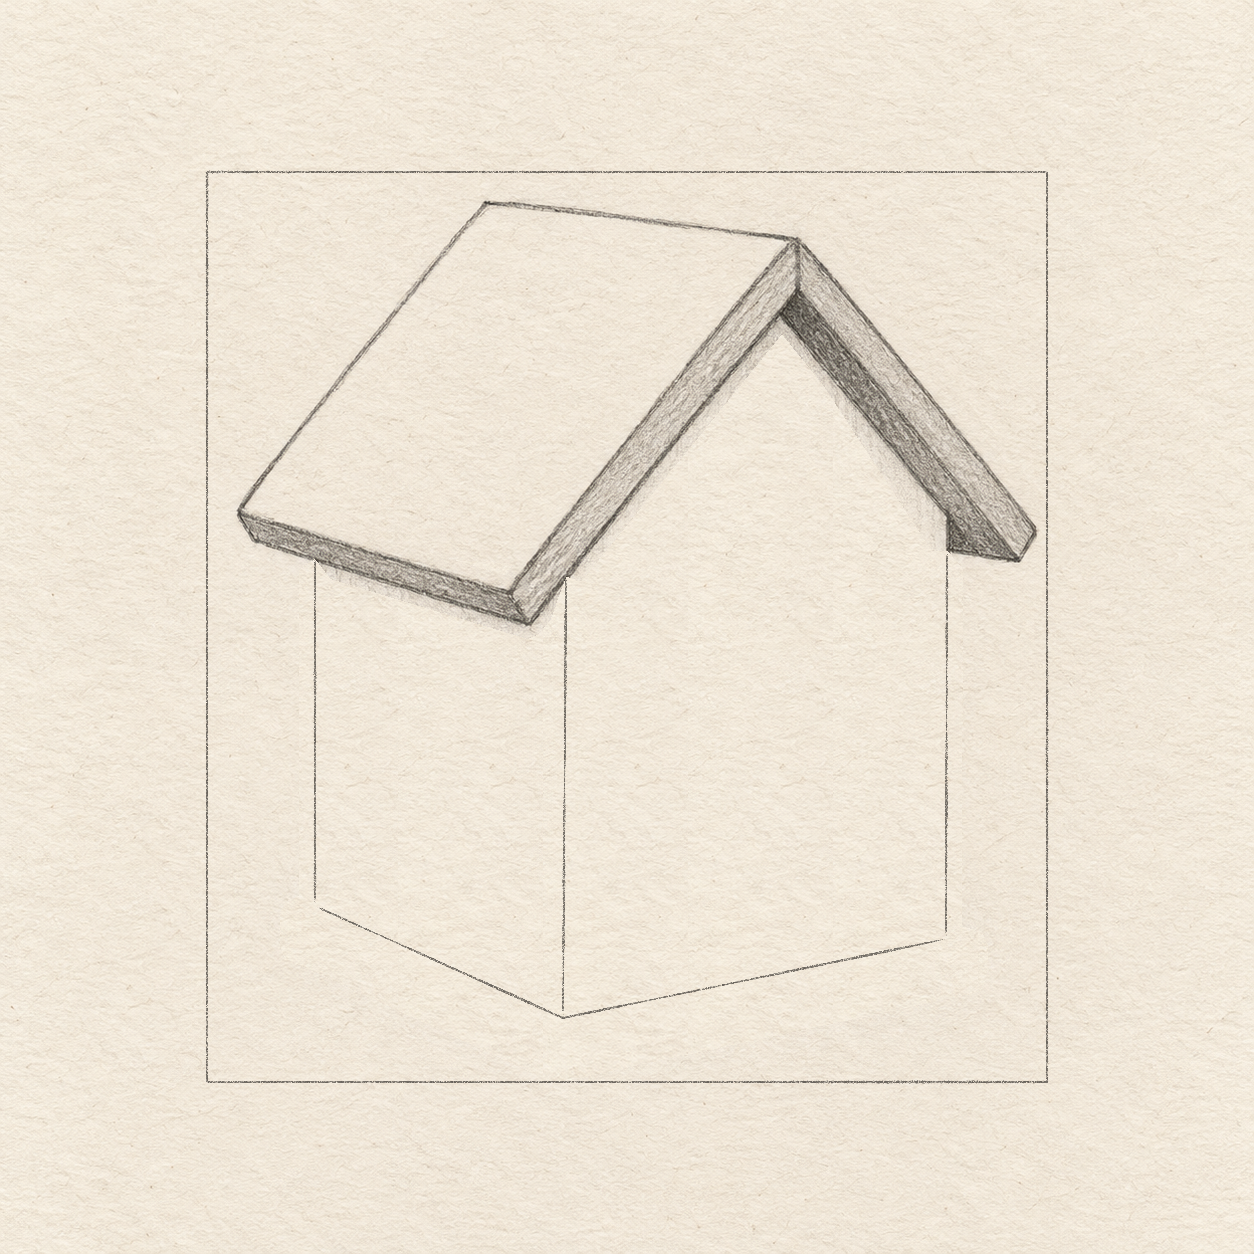
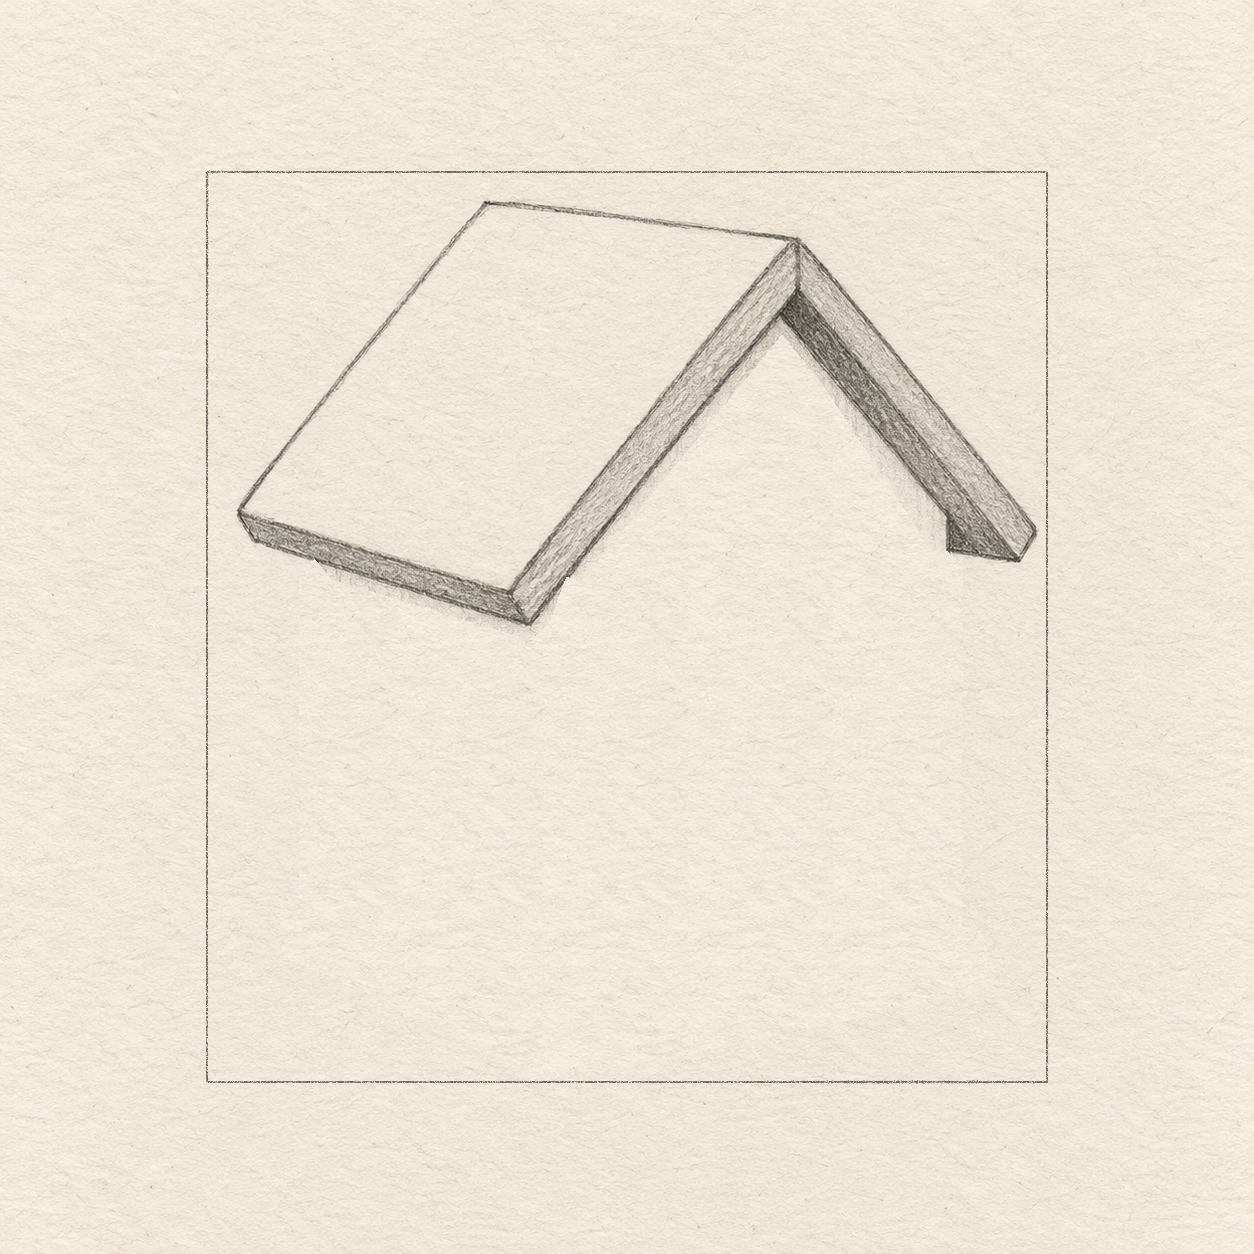
    The complete pitched roof is selected in broken pencil with dark lower strips and an otherwise pale broad roof plane; local roof planning strokes are lifted.
    Drawing 2C — Selected pencil roof and edge shadeView larger

    Instructions for Drawing 2C — Selected pencil roof and edge shade

    1. Follow the corner routes in Drawing 2B with short HB strokes, selecting the roof ridge, broad plane and complete inner and outer strip edges. Keep the same corners, but allow small freehand unevenness along the straight guides. Do not redraw the roof at a different angle.
    2. Keep the broad roof face mostly bare paper. Inside the narrow roof strips, add short pencil hatching along their sloping lengths, varying the small strokes by eye. Build the darkest graphite inside the strips near their lower edges, especially along the front strip.
    3. Just beneath the inner right-hand roof slope, add a very faint, narrow wedge of pencil tone. Start about halfway down that slope and taper toward its lower corner. Keep the tone within about 3 mm of the existing edge, fading softly into the paper.
    4. With a soft eraser, gently erase only exposed roof corner dots and straight planning strokes after their selected edges are in place. Keep the chosen pencil roof, its shading and the working box.
    Next step — Draw the two walls
  3. Step 3 of 7 · Pencil

    Draw the two walls

    Three light wall guides descend from the actual roof underside to separately measured lower corners, joined by two lower sloping edges.
    Drawing 3A — Three wall drops and two lower joinsView larger

    Instructions for Drawing 3A — Three wall drops and two lower joins
    1. Use the box corner to place the wall feet: the left foot is 1.5 cm across and 10.5 cm down; the near foot is 5.1 cm across and 12.1 cm down; the right foot is 10.6 cm across and 11 cm down. Draw light, nearly upright lines up from them to the roof underside in Drawing 3A. Stop at the roof; do not continue through it.
    2. Join the left foot down-right to the near foot, then the near foot up-right to the right foot. The near upright is one shared corner, not two close lines. Compare these two wall widths in Drawing 3A before selecting darker edges.
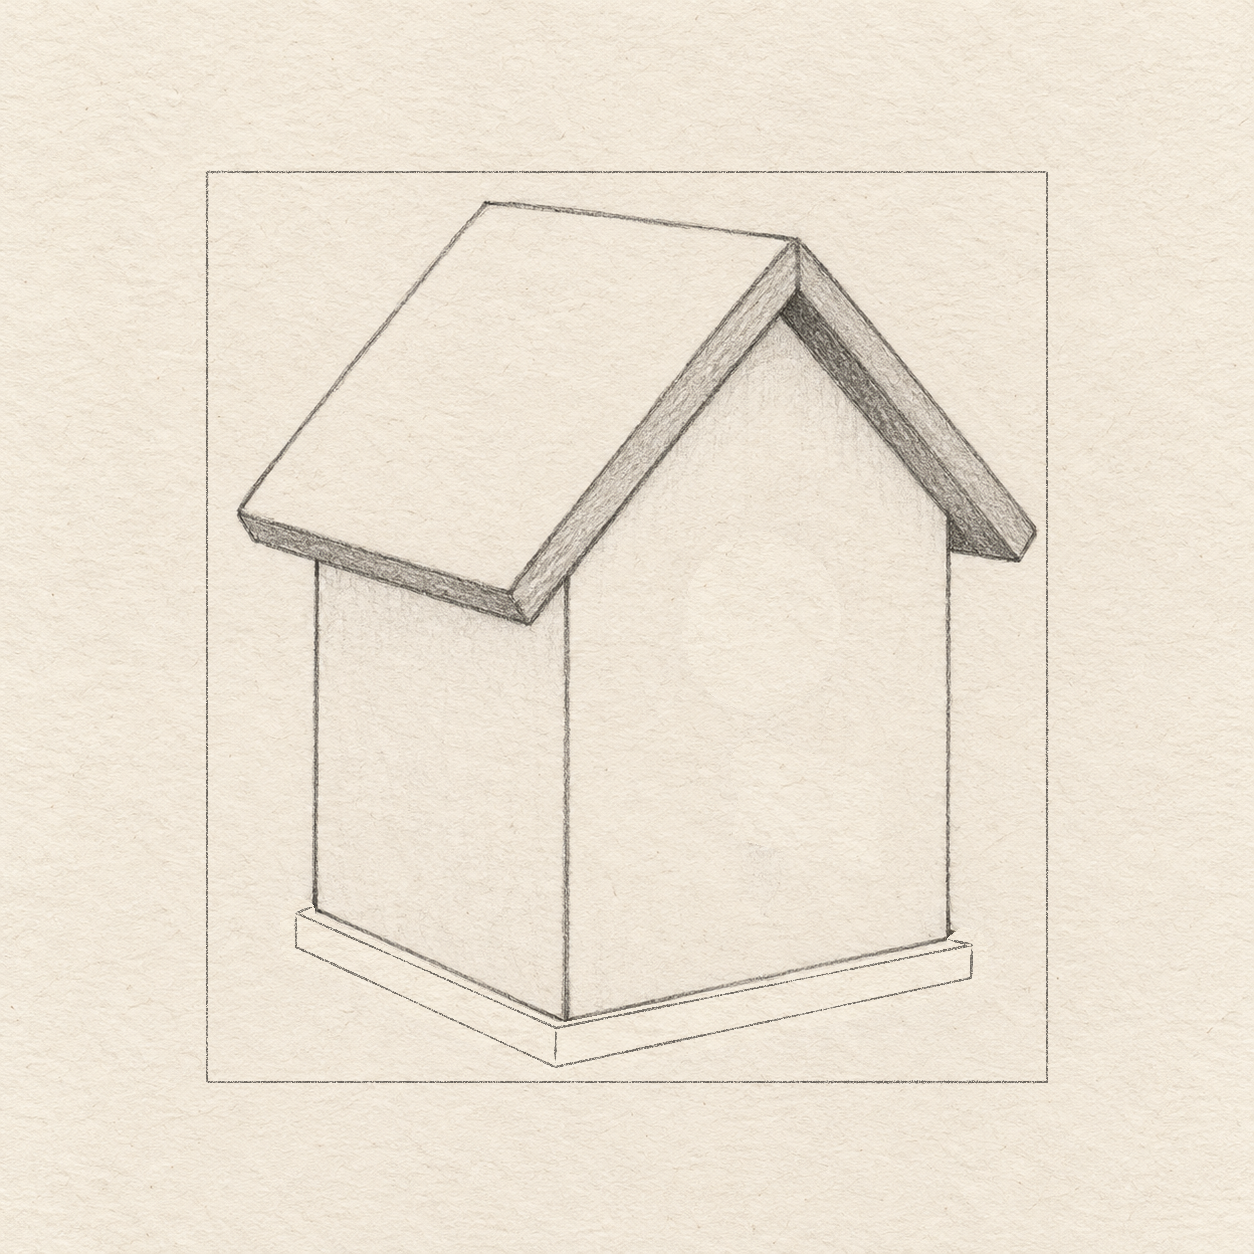
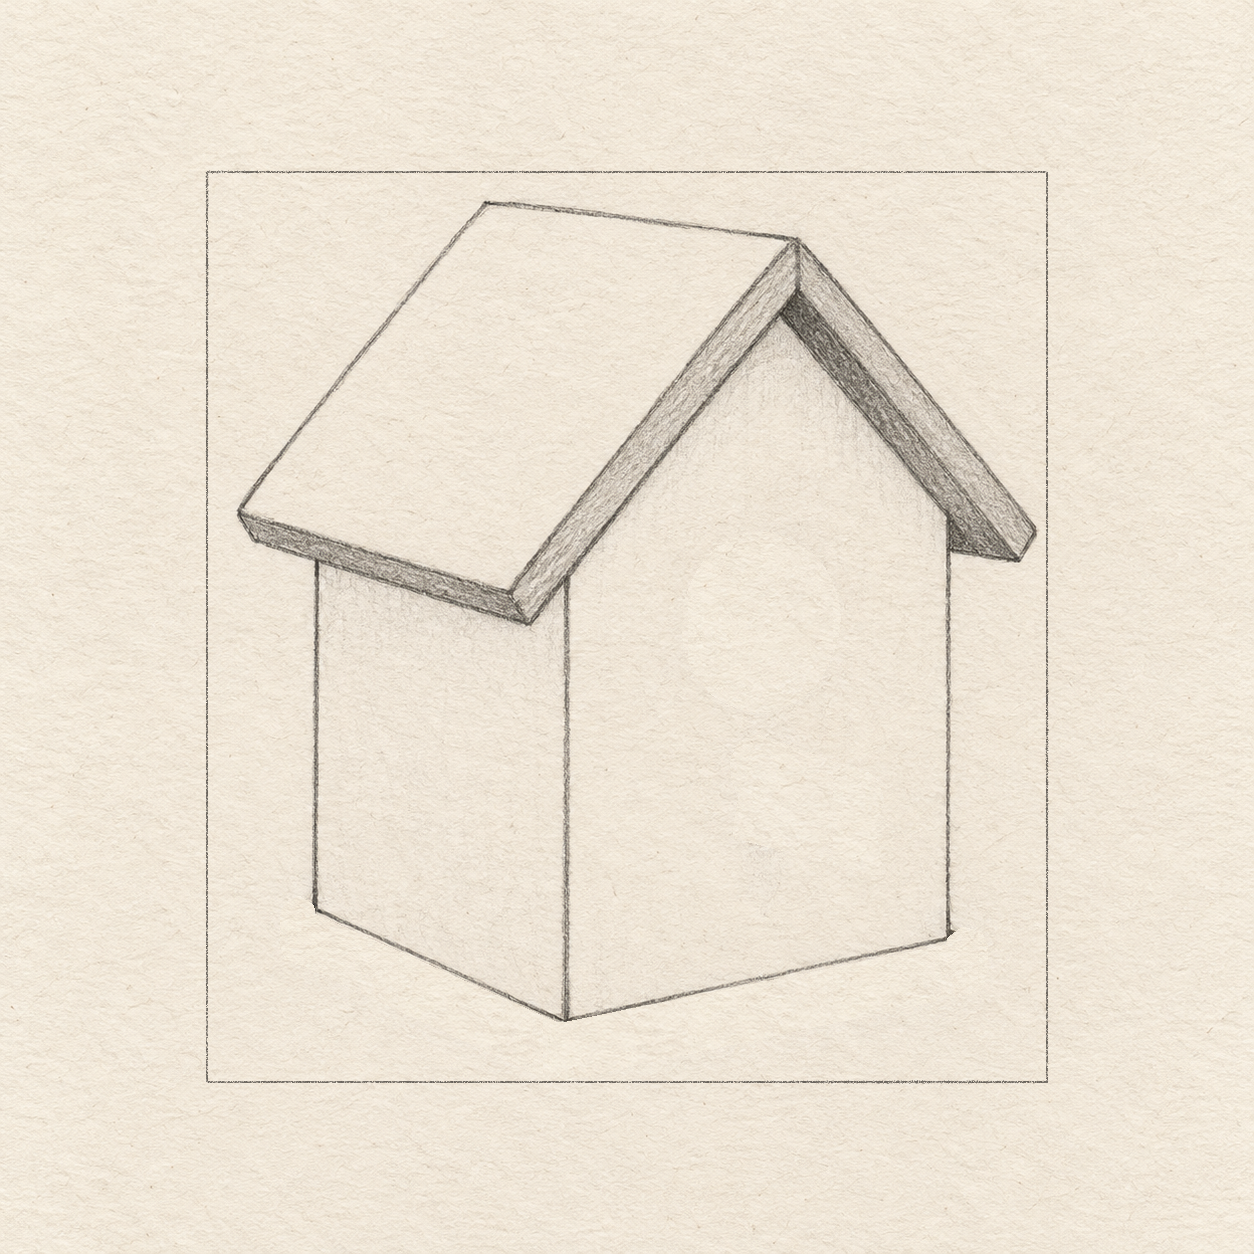
    The wall contours now share one near upright, with pale local graphite under the roof and mostly open front and side faces; no opening or perch yet.
    Drawing 3B — Pencil wall edges and light roof shadowView larger

    Instructions for Drawing 3B — Pencil wall edges and light roof shadow

    1. Use the light wall routes in Drawing 3A to choose the three upright edges and the two lower joins with short HB strokes. Draw the near shared corner once. Keep the upper ends tucked against the roof underside, with no new wall line crossing a roof strip.
    2. With very light pressure, lay a little soft graphite immediately under the sloping roof overhangs. On the left wall, let this fade downward; on the front, keep the faint shade just inside the sloping roof edges near the peak. Leave the large wall centres pale. The tiny hatch spacing can vary freehand.
    3. With a soft eraser, gently erase only exposed straight wall planning strokes once the chosen wall edges are visible. Preserve the selected edges, their pale shade and the working box.
    Next step — Project the low base
  4. Step 4 of 7 · Pencil

    Project the low base

    A low pencil base projects slightly beyond all three selected wall feet; its two sloping top edges and three short thickness drops are complete.
    Drawing 4A — Projecting base and its thicknessView larger

    Instructions for Drawing 4A — Projecting base and its thickness
    1. Place the base’s upper left corner about 3 mm left and 1 mm down from the left wall foot. Put its upper near corner about 1 mm left and 1.5 mm down from the near wall foot.
    2. Put the upper right corner about 4 mm right and 1 mm down from the right wall foot. Join left to near to right, and join each outer end back to its wall foot.
    3. From those three new upper corners, draw short drops about 5 mm down. Join their lower ends left to near to right. Keep the two bottom slopes close to their corresponding upper slopes, and compare the thin base in Drawing 4A before darkening it.
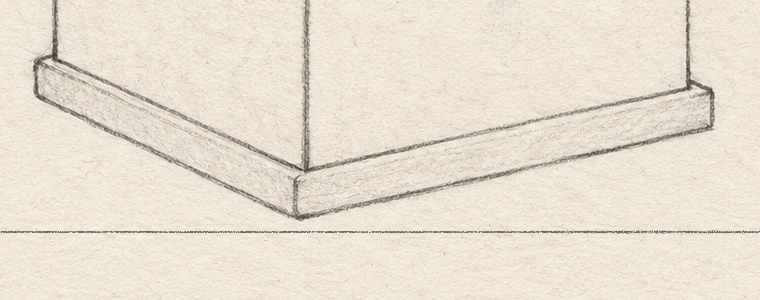
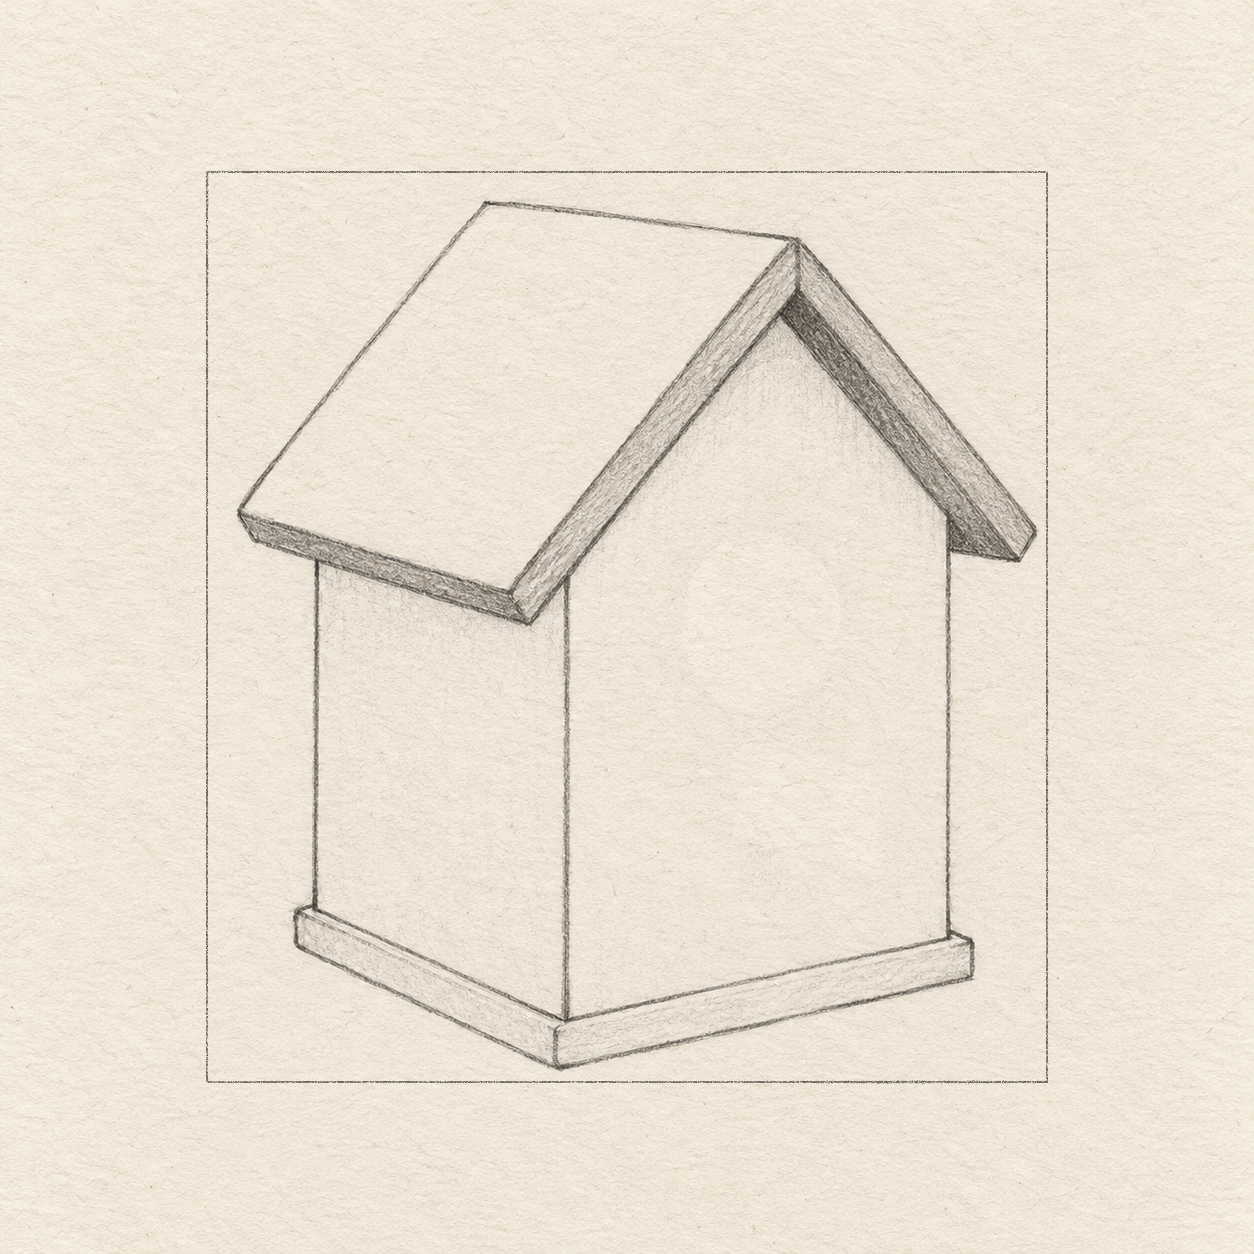
    The complete low base is selected in pencil, with its near thickness join and small local graphite inside the strips.
    Drawing 4B — Selected base with restrained graphiteView larger
    The narrow top ledge and lower edge stay separate. The short near-corner drop joins both strips without a gap or a flat single-line base.
    Detail 4B.1 — Base thickness and the near cornerThe narrow top ledge and lower edge stay separate. The short near-corner drop joins both strips without a gap or a flat single-line base.

    Instructions for Drawing 4B — Selected base with restrained graphite

    1. Choose the base’s top edges, three short drops and bottom edges along Drawing 4A’s routes. Use short freehand HB strokes and keep both the left and right end returns; do not close the base with a single flat line.
    2. Add a little light graphite inside the two narrow base strips, following their sloping lengths. Strengthen a few lower-edge strokes by eye, but keep the narrow top ledge lighter and avoid a solid dark border.
    3. With a soft eraser, gently erase only exposed base planning marks after selecting its edges. Keep the finished roof, walls, base and working box.
    Next step — Draw and shade the entry
  5. Step 5 of 7 · Pencil

    Draw and shade the entry

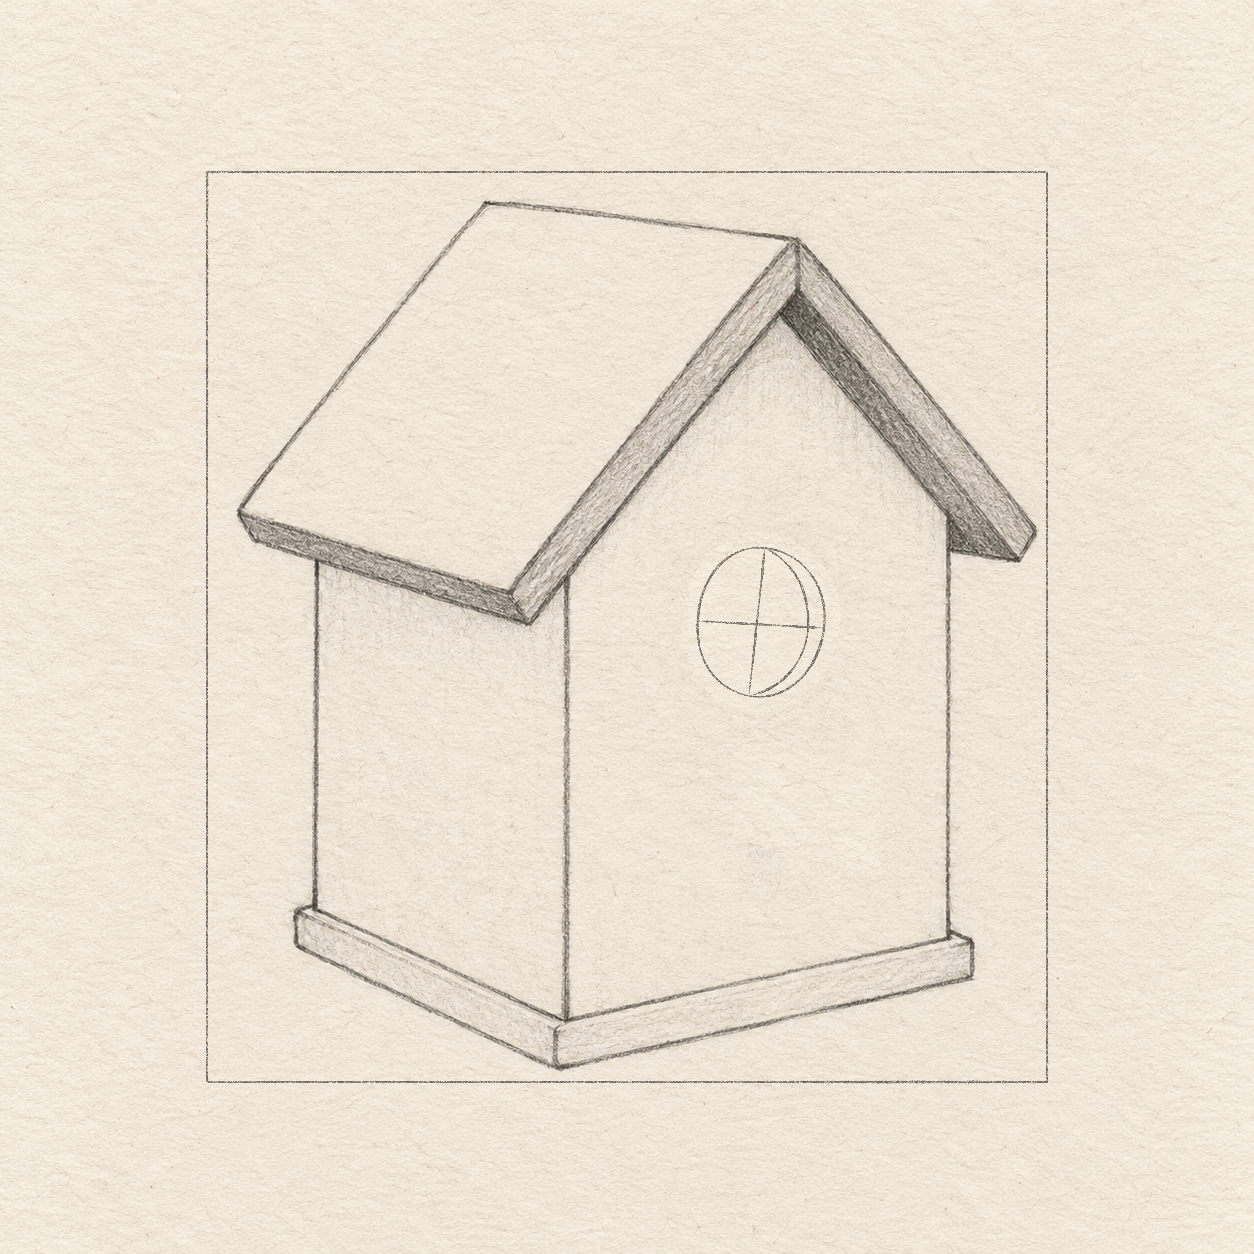
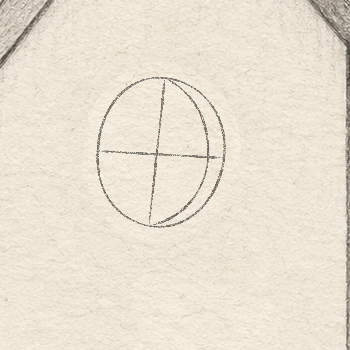
    Two light crossing guides, an empty tilted entry oval and a separate inside right curve are placed on the front wall before any dark filling.
    Drawing 5A — Tilted entry oval and lighter right rimView larger
    The long guide leans left as it descends. The inside-right curve leaves a narrow rim, widest midway down and tapering at the two ends.
    Detail 5A.1 — Empty entry and the right rim reserveThe long guide leans left as it descends. The inside-right curve leaves a narrow rim, widest midway down and tapering at the two ends.

    Instructions for Drawing 5A — Tilted entry oval and lighter right rim
    1. On the front wall, measure from the box corner. Mark the opening’s top 8 cm across and 5.4 cm down, and its bottom 7.7 cm across and 7.5 cm down.
    2. Mark its left end 7 cm across and 6.4 cm down, and its right end 8.8 cm across and 6.5 cm down. Lightly join top to bottom and left to right; these guides set the opening’s tilt and size.
    3. The oval’s bottom leans slightly left of its top. Rehearse that curve above the paper first, then draw an empty oval freehand through the four guide ends. Gently correct a bulging side before darkening, keeping the tilt shown in Drawing 5A.
    4. Inside the oval’s right side, draw a second freehand curve from its top to its bottom. Leave about 2–3 mm between the curves at their widest right-hand gap, tapering the gap to nothing at both ends. This narrow right rim must stay lighter than the entry’s dark centre.
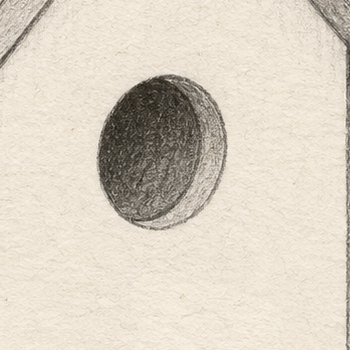
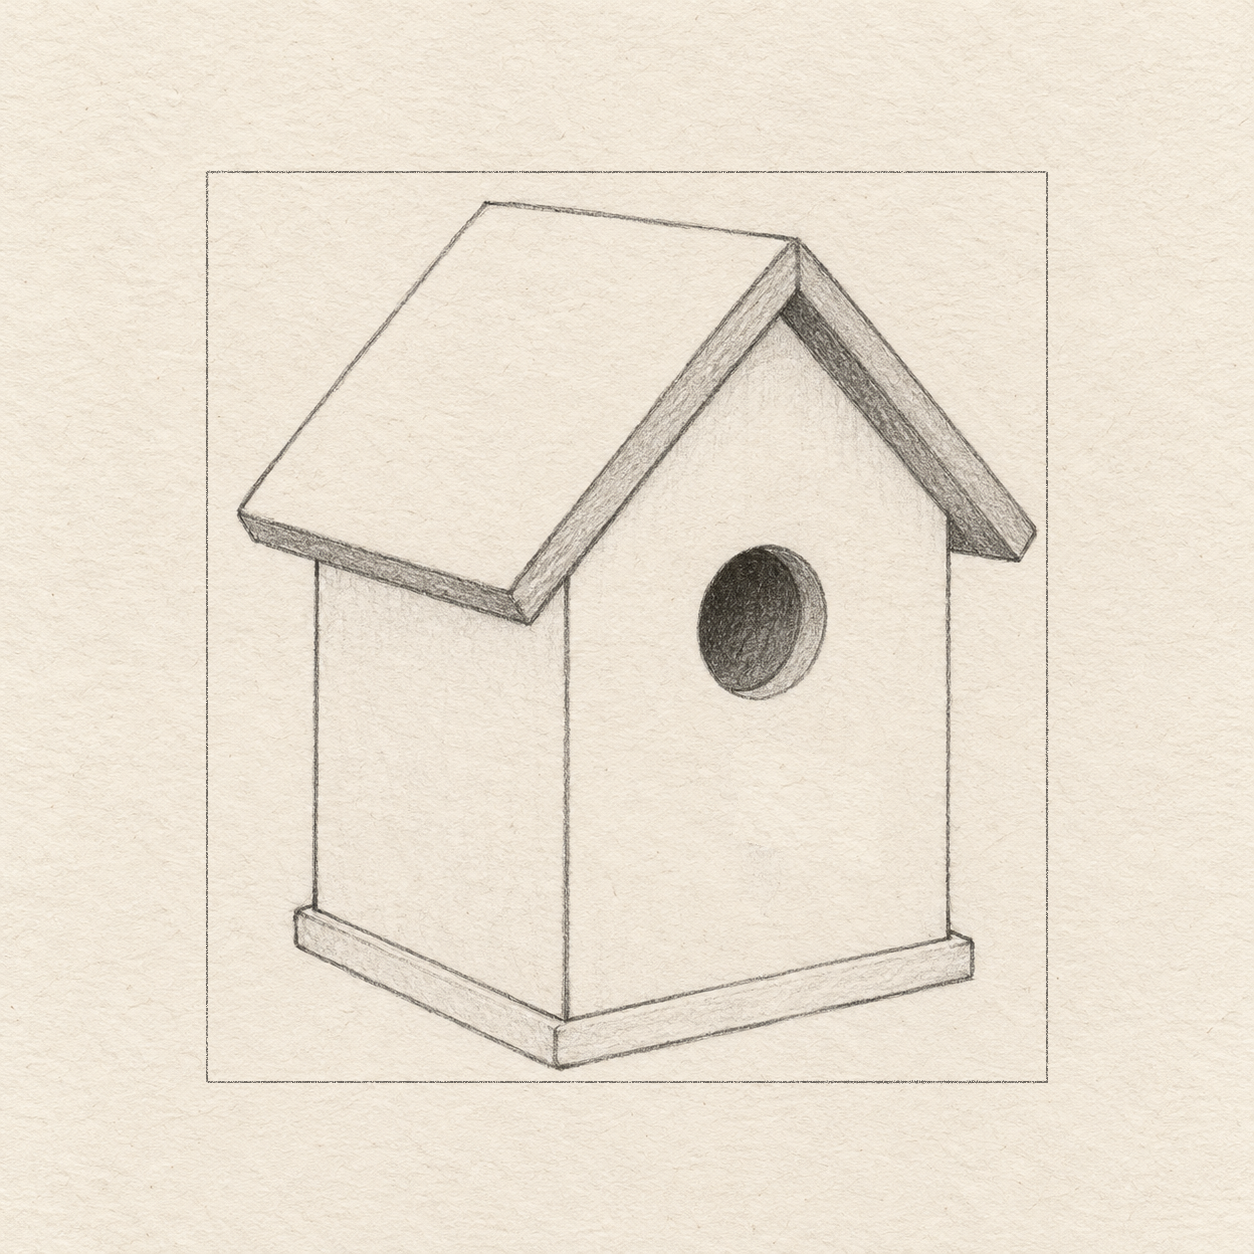
    Short dense graphite fills the entry inside the planned rim, while the narrow right rim remains lighter and the surrounding wall stays pale.
    Drawing 5B — Dark entry with its lighter rimView larger
    The dark oval stops at the separate inside-right curve. The narrow rim stays lighter than the centre, while its width tapers at the top and bottom.
    Detail 5B.1 — Dark centre and lighter right rimThe dark oval stops at the separate inside-right curve. The narrow rim stays lighter than the centre, while its width tapers at the top and bottom.

    Instructions for Drawing 5B — Dark entry with its lighter rim

    1. Use Drawing 5A’s oval to select the slightly uneven outer entry edge with short pencil strokes. Follow the already placed tilt and four ends; the right inner curve locates the lighter rim, rather than a second hole.
    2. Keep the narrow right rim lighter. Inside the remaining oval, build dark graphite gradually with short overlapping strokes; use 2B if available. Follow the rounded interior, let some grain show through, and keep the nearby wall clean. Add only a little light graphite to the rim itself.
    3. With a soft eraser, gently erase only exposed crossing guides and spare light oval marks, working around the selected entry and rim. Keep the working box for placing the perch.
    Next step — Build the short perch
  6. Step 6 of 7 · Pencil

    Build the short perch

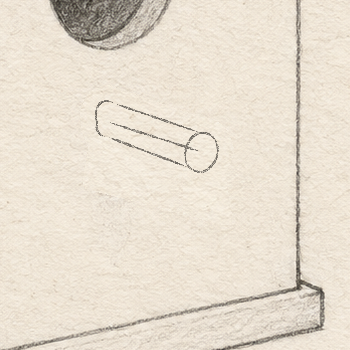
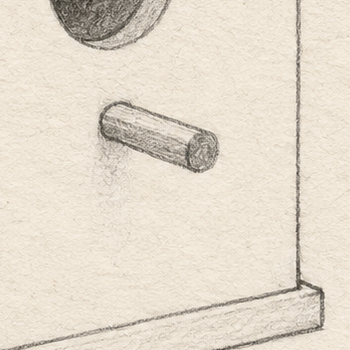
    An unfilled short cylinder slopes down-right below the entry, with a partial rear contact, a complete front oval and two separate side guides.
    Drawing 6A — Perch direction, rear contact and oval endView larger
    The direction guide runs through the cylinder. Only the left rear arc is visible; two sides join it to the complete tilted forward oval.
    Detail 6A.1 — Rear arc, two sides and forward ovalThe direction guide runs through the cylinder. Only the left rear arc is visible; two sides join it to the complete tilted forward oval.

    Instructions for Drawing 6A — Perch direction, rear contact and oval end
    1. Below the entry, mark the perch’s rear centre 7.9 cm across and 8.6 cm down from the box corner. Mark its forward centre 9.2 cm across and 9 cm down. Join them lightly; this line gives the perch’s down-right direction, not an outside edge.
    2. At the forward centre, allow an oval about 5 mm wide and 6 mm tall, with its bottom leaning left. Shape it by eye: curve freehand from its top around the right side, turn around the low point and return up the left side to close it. At the rear centre, draw only a left-hand arc about 3 mm wide and 6 mm tall: curve freehand from its upper end out left, round the middle and return right to its lower end. Keep the rear right side open for the cylinder; do not draw a second complete oval through it.
    3. Keep the cylinder unfilled. Using freehand lines roughly along the direction guide, join the top of the rear arc to the top of the forward oval, then join the rear arc’s bottom to the oval’s lower-left edge. Compare the complete perch in Drawing 6A.
    The short graphite perch has two sloping sides, a darker oval cap, a restrained rear contact and a small soft shadow beneath it.
    Drawing 6B — Selected perch and local graphiteView larger
    The forward cap is darker, the upper cylinder stays lighter, and the small soft contact shadow remains local rather than spreading over the wall.
    Detail 6B.1 — Cap, upper light and contact shadeThe forward cap is darker, the upper cylinder stays lighter, and the small soft contact shadow remains local rather than spreading over the wall.

    Instructions for Drawing 6B — Selected perch and local graphite

    1. Select the rear arc, two cylinder sides and forward oval along Drawing 6A’s routes with short HB strokes. Keep the cylinder sloping down-right and preserve the separate oval cap; do not extend either side across the cap.
    2. Add a few short lengthwise pencil strokes along the lower cylinder, keeping its upper strip lighter. Darken the oval end with small curved strokes. Add a little soft graphite at the rear wall contact and immediately beneath it; let this small shadow fade within about 6 mm below the perch. Vary the light hatching by eye.
    3. With a soft eraser, gently erase only the exposed perch direction line and spare light construction strokes. Preserve the selected cylinder, oval end, small shadow and working box until the final drawing.
    Next step — Clean the construction
  7. Step 7 of 7 · Pencil

    Clean the construction

    The completed pencil birdhouse retains its pitched roof, two pale walls, low base, dark entry with lighter rim and short cylindrical perch; the working box is erased.
    Drawing 7A — Finished pencil birdhouseView larger

    Instructions for Drawing 7A — Finished pencil birdhouse

    1. Gently erase the remaining working box in small sections. Keep the chosen roof, walls, base, entry and perch; avoid rubbing across their graphite or the lighter entry rim.
    2. Keep the broad roof and walls pale, with broken pencil edges rather than one heavy outline. If a selected edge needs a small correction, strengthen only that short part by eye. Stop before adding new wood grain or filling the broad faces.
    Back to the tutorial

If something looks off

The roof slopes look wrong

Return to the four roof corners and the separate far-right eave. Compare their across/down positions from the same box corner, then correct the light joins before selecting stronger edges.

The walls or base look flat

Keep the one near shared upright and the two different lower slopes. The base projects slightly beyond the three wall feet and has its own short thickness drops; it is not a second flat wall line.

The opening loses its rim

Keep the inside-right curve visible before filling. Darken the centre in small passes, leaving the narrow right rim lighter; avoid widening that rim into a constant-width ring.

The perch looks like a dark stick

Keep its complete tilted front oval, two separate sides and lighter upper strip. The rear attachment has only a visible left arc, and its soft graphite stays close below the perch.